The Form view in Abtrac lets you enter and manage timesheet lines in both Linear Form and Cross Tab Form timesheet layouts. This guide explains how to add, edit, and delete time entries and disbursements, and provides tips for efficiently recording project time.

About Linear Form and Cross Tab Form timesheets
The Timesheets Form view uses fields at the top of the timesheet for input. Most fields are searchable dropdown lists, making it easier to locate jobs, tasks, and activities.
Only the form view of timesheets contains a timer/stop clock.
The form is the same for both Linear and Cross Tab views, the difference is in the tables that display all the current, saved timesheet lines below the form.
Linear Form view
Linear Form view shows time line by line with dates down the page. It’s great for detailed daily entries or when you complete lots of small tasks in one day.

Cross Tab Form view
Cross Tab Form view groups jobs row by row with dates across the top right. It’s useful when you’re working on fewer jobs with larger blocks of time, often repeating the same tasks or projects.

Adding timesheet lines using the Form view
The timesheets form works best if you enter your fields in order. Most form fields are configured by your administrators and may be optional or required depending on your organisation’s settings.
1. Select the Date
Enter the date for your time entry. The date format is set for all users from System Settings.
Date fields are either:
- DD MMM YYYY e.g. 31 JAN 2024, or
- DD/MM/YYYY e.g. 31/01/2024
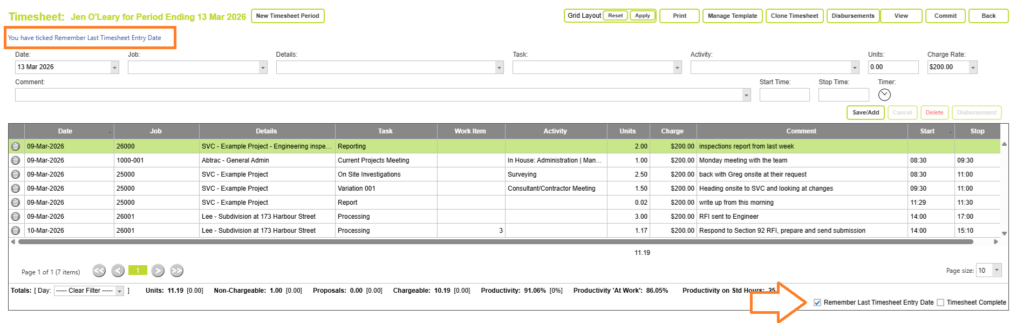
Remember Last Timesheet Entry Date
When using the form view you can leave the date field blank.
If left blank, Abtrac will default to today’s date.
If the “Remember Last Timesheet Entry Date” option is enabled in your settings, Abtrac will remember the last timesheet entry date. You can do this from the checkbox at the footer of your timesheet in Linear Form View, or from within the My Settings page.
2. Select the Job
Use either the Job Code or Job Details box to choose your project. Selecting the job in either box will fill out details in the other. You can type part of a name or a number to search for projects. Administrators control the default sort order of both these boxes, but you can customise this in Edit My Settings.
Job Code dropdown
Shows the job code description and the full client name. Type Job code numerals in here to search.

Job Details dropdown (Job Combo Box)
Shows the client abbreviation, job description, and job code. Type letters and words in here to search.

3. Optionally add timesheet classifiers: Tasks, Activities, Work Items, Comments
The only mandatory fields on every timesheet line are a date and a job code. All other choices in the form are configured by your Abtrac administrators, including whether fields are optional or required.
- Tasks (also called phases or stages) are linked to project fee estimates, and how the project will be invoiced.
- Work Items are sometimes associated with tasks, but can be independent. They are small steps of work, with a due date, that can be ‘ticked off’ as they are completed.
- Activities are descriptive and can be shared across multiple projects, they can also be used to control charge rates.
- Comments are also descriptive, to provide additional context and are often referenced within invoices.
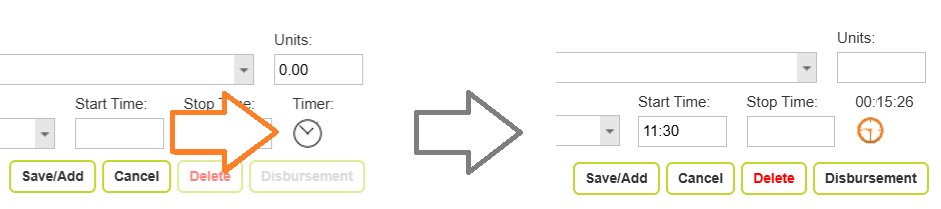
4. Record Time (units or timer)
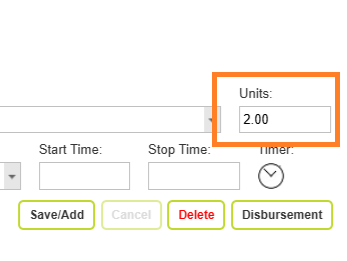
Units
Enter units directly (the unit conversion is set by your admins, where typically 1.0 equals one hour)
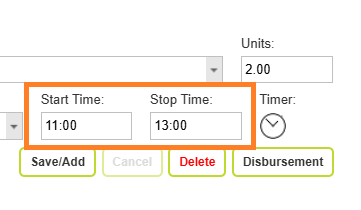
Use Start and Stop times to calculate units
You can use the start and stop time boxes to calculate total units for you. The start/stop times use a 24 hour clock, where 13:00 = 1pm. Once a stop time is added, the units box is updated.
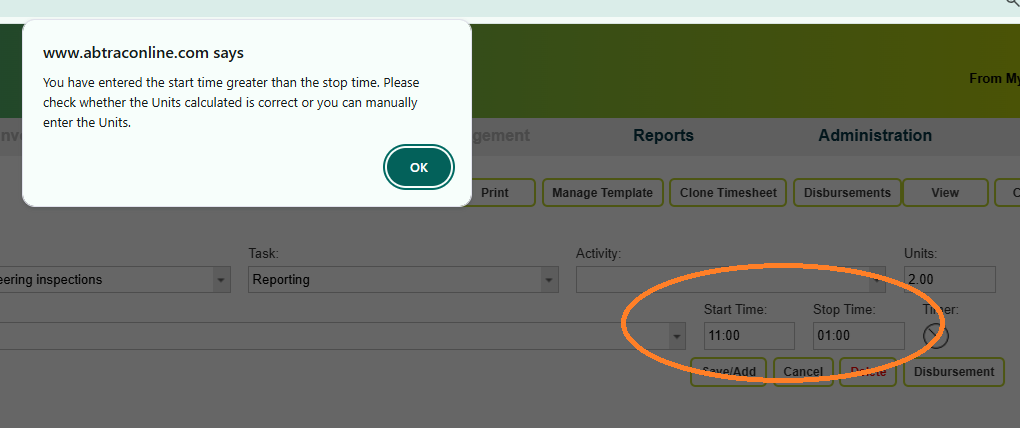
If your start and stop times span a 24 hour day, eg. the stop time is ‘earlier’ than the start time (either legitimately or accidentally), Abtrac will prompt you to confirm these times when saving “You have entered the start time greater than the stop time. Please check whether the Units calculated is correct or you can manually enter the Units.”.
Use the timer button (Stopwatch) to count units
To use the timer (stopwatch button) – click the timer button to start counting, and click it again to stop the timer.

Timer Pop Up options
When stopping the timer, you may see a popup “Would you like to save the timesheet with 0.01 units recorded from the timer?”
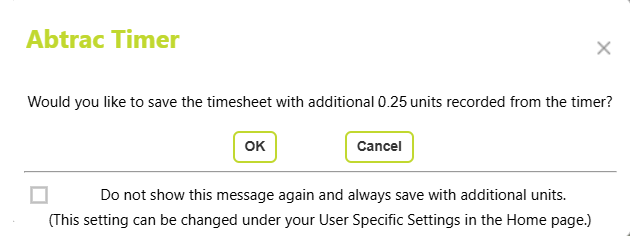
OK – saves the timesheet line with the recorded units and clears the form. You don’t need to use the Save/Add new button from the form to save your entry, just this pop up will do.
Cancel – pauses the timer, keeping the accrued time. Click the timer button again to resume counting and add more units. This is useful when the task you are working on is interrupted by phone calls etc, and you want to pause work and then resume.
From Edit my settings you can control whether you see the Timer Popup, and what options are set for Add New options.
Timer “Add New” Options
Are controlled from the Edit My Settings menu.
If you select an existing timesheet line from the grid and use the timer button, when your settings are saved as:
1 – Clicking the timer creates a new timesheet line, and a new count of time, copying the previous client, job, and classifier details for convenience.
0 – Clicking the timer edits the existing line, and just continues timing on the same timesheet line – accruing more time. Useful if you pause work (e.g., take a call) and then resume, or if you are jumping between projects within a day.
Rounding & Timer Behaviour
Depending on system settings, Abtrac may round stopwatch time to the nearest 5, 10, or 15 minutes.
5. Save the timesheet line entry
Click Save/Add to post the time.
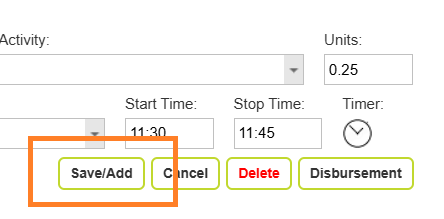
This will also clear the form, ready for a new timesheet line entry.

Missing fields will prevent you from saving the timesheet line
Any mandatory fields that have not been completed will display a red exclamation mark with a hover tooltip explaining what is needed.
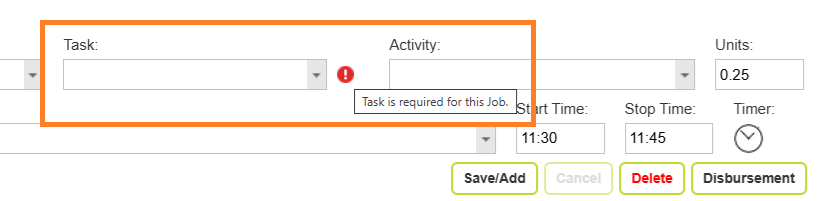
With the exception of Date and Job Code, any other required fields are managed by your Abtrac administrators. If your timesheet is prompting for required fields that you are unsure about, speak with your administrator. These settings are controlled in System Settings and can be adjusted if needed.
Edit Timesheet Lines using the Form view
To edit an existing timesheet line using the Form view in Abtrac, start by selecting the line displayed in the grid that you want to update.
In Cross Tab Form view click on the units cell.
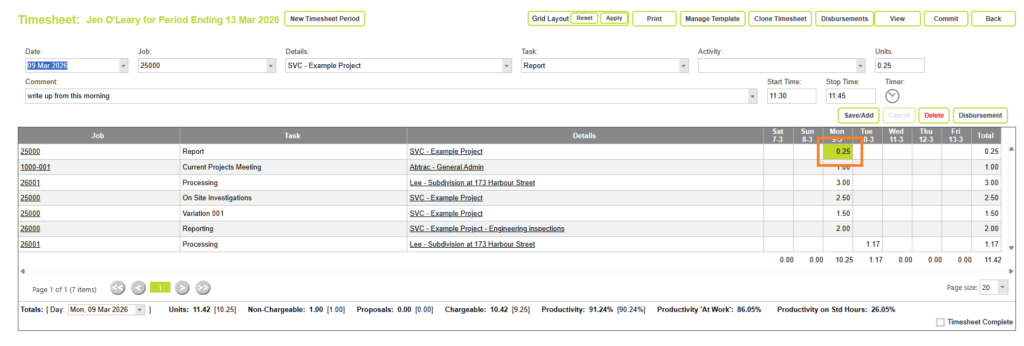
In Linear Form View click on the releveant row.

Once selected, the details of that entry will populate in the Form view, allowing you to make changes as needed.
You can adjust fields such as the date, job, task, activity, comments and units.
After making your changes, click Save/Add to overwrite the original entry with the updated information.
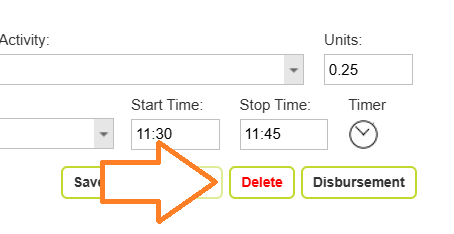
Delete Timesheet Lines using the Form view
To delete an existing timesheet line using the Form view in Abtrac, start by selecting the line displayed in the grid that you want to remove.
In Cross Tab Form view click on the units cell.
In Linear Form View click on the releveant row.
Once selected, the details of that entry will populate in the Form view.
Click the Delete button to remove the line from your timesheet.
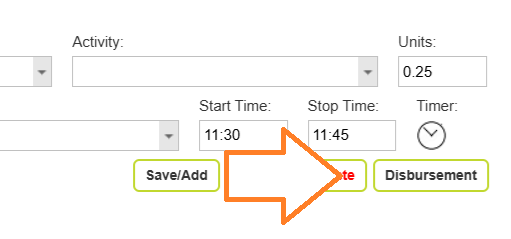
Adding disbursement lines using the Form view
With the form view of timesheets you can quickly record out-of-pocket expenses (disbursements) against a project while you are completing your timesheet.
Start by selecting the line displayed in the grid that you want to add a disbursement for..
Abtrac will automatically link the disbursement to the selected project, so you don’t need to re-enter job details.
In Cross Tab Form view click on the units cell.
In Linear Form View click on the releveant row.
Once selected, the details of that entry will populate in the Form view.

Click on the Disbursement button within the form to add a disbursement to your timesheet.
This will open a popup window for entering expense details.
In the popup window:

- Click on the plus button to add one (or multiple) disbursement(s) for the selected project
- Select a Disbursement Type (e.g. mileage, printing, travel)
- Enter the Quantity
- Enter the Amount
Click Save in the popup window to add the disbursement to your timesheet.
Video: Linear Form and Cross Tab Form timesheets
Other timesheet views and layouts
Abtrac offers multiple timesheet views and layouts to suit different working styles. In addition to Form view, you can use Grid view for faster, spreadsheet-style entry, and switch between Linear and Crosstab layouts depending on how you work.
You can change your layout at any time using the View option at the top of your timesheet, or save your preferred layout under Edit My Settings.
Read more:
Changing your timesheet view and layout
Cross Tab Grid view timesheets
Abtrac KB# 2243 / AV # 0038