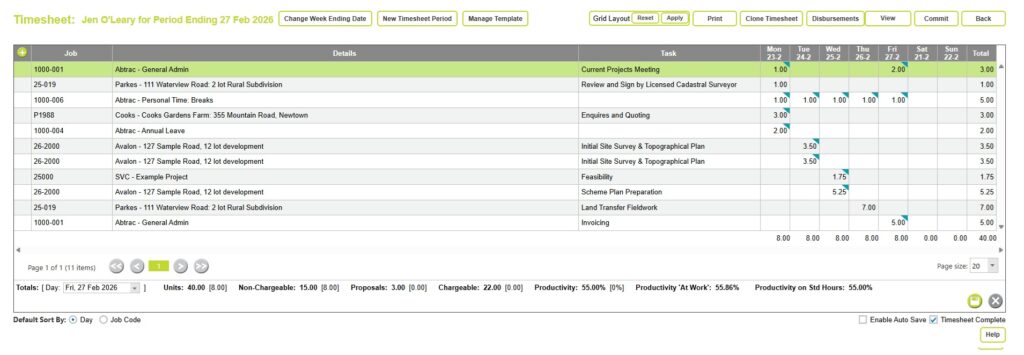
The Cross Tab Grid view organises your timesheet into a table format, with jobs and tasks on the left and a column for each day (7 or 14 days) across the top. You can enter, edit, and review time directly within the grid for a fast, spreadsheet-style experience. This guide covers how to add, edit, and delete time entries and disbursements, along with tips for recording project time efficiently in this view.
About Cross Tab Grid timesheets
The Cross Tab Grid view is a flexible way to enter and manage your timesheets in Abtrac, using a grid layout to quickly add, edit, and save multiple lines of time.
Your timesheet is displayed as a table, with jobs and tasks on the left and daily columns (7 or 14 days) across the top. This works well when you’re focusing on fewer jobs with larger blocks of time, repeating the same tasks across the week, or working on the same projects day to day. It’s also a good fit if you like to clearly see your daily totals (for example, 8 hours per day) as you go.
You can enter, update, and review time directly in the grid for a fast, spreadsheet-style experience.
Adding timesheet lines using the Cross Tab Grid view
The Cross Tab Grid timesheet fields are configured by your administrators, job code is required all others may be optional or required depending on your organisation’s settings. Dates for the current timesheet period are displayed in columns on the right of the grid (table).
1. Adding new timesheet lines to the Cross tab Grid
To add a new timesheet line for a job that isn’t already in your grid, click the plus button in the top left.

2. Select the Job
Use either the Job Code or Job Details box to choose your project. Selecting the job in either box will fill out details in the other. You can type part of a name or a number to search for projects. Administrators control the default sort order of both these boxes, but you can customise this in Edit My Settings.
Job Code dropdown
Shows the job code description and the full client name. Type Job code numerals in here to search.
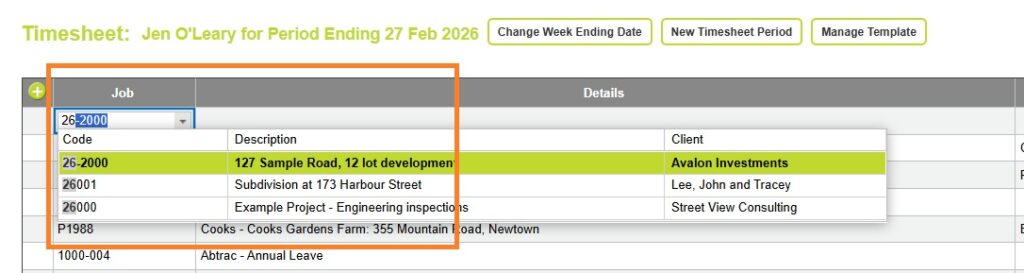
Job Details dropdown (Job Combo Box)
Shows the client abbreviation, job description, and job code. Type letters and words in here to search.

3. Optionally add timesheet classifiers: Tasks, Activities, Work Items
The only mandatory fields on every timesheet line are a date and a job code. All other choices in the form are configured by your Abtrac administrators, including whether fields are optional or required.
- Tasks (also called phases or stages) are linked to project fee estimates, and how the project will be invoiced.
- Work Items are sometimes associated with tasks, but can be independent. They are small steps of work, with a due date, that can be ‘ticked off’ as they are completed.
- Activities are descriptive and can be shared across multiple projects, they can also be used to control charge rates.
4. Select the Date (if the job already exists in the gird, skip to this step)
Select the cell in the project row beneath the date column for which you want to record time.
Use this for existing projects or newly added lines, as shown in the screenshots below.
Selecting the date, for newly added lines

Selecting the date, for existing timesheet lines
You don’t need to create a new line for each day – if the project and task combination has already been used, simply click the cell where the project row and the relevant date column intersect to enter your time.

4. Record Time as Units
Enter units directly (the unit conversion is set by your admins, where typically 1.0 equals one hour)

Rounding & Timer Behaviour
Depending on system settings, Abtrac may round time to the nearest 5, 10, or 15 minutes.
5. Optionally add timesheet comments
Timesheet comments are descriptive, and are used to provide additional context, they are often referenced within invoices.
To add comments to a timesheet line – once you’ve entered your units double click within the units cell to access the timesheet comments pop up. (Pressing Enter after typing your units will also open the comments box).

Enter text directly into comments box, or pick from default comments pre-set by your administrator via the drop down box.
Choose Update Comments to save your comments and close the pop up. Note that this does not save the timesheet line, you will still need to click the Save icon on the bottom right of the page to post the time.
How to view timesheet comments in the Cross Tab Grid
Comments are hidden from view in the Cross Tab Grid view. Cells with a triangular marker indicate entries with comments. You can hover over these to view comments, or double click within the cell to open the comments box.

6. Save the timesheet line entry
Click the Save icon on the bottom right of the page to post the time.

Missing fields will prevent you from saving the timesheet line
Any mandatory fields that have not been completed will display a red exclamation mark with a hover tooltip explaining what is needed.

With the exception of Date and Job Code, any other required fields are managed by your Abtrac administrators. If your timesheet is prompting for required fields that you are unsure about, speak with your administrator. These settings are controlled in System Settings and can be adjusted if needed.
Edit Timesheet Lines using the Cross Tab Grid view
To update a timesheet line, first select the entry in the grid that you want to change, then click the cell for the units you want to edit.
You can adjust fields such as date, job, task, activity, comments, and units.
If you only want to change the entry for a specific day (for example, Tuesday) without affecting the same job or task on other days, you should either:
- Add a new row, or
- Use the Linear Grid view to split the line into a separate entry for that day.
After making your changes, click Save to overwrite the original entry with the updated information.

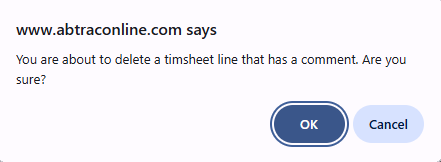
Delete Timesheet Lines using the Cross Tab Grid view
To delete a timesheet line, first select the entry in the grid that you want to change, then click the cell for the units you want to edit.
Once selected, use your keyboard buttons to delete the units for the selected day, and choose Save. If there’s only one entry for the project, this will also delete the entire line.
You might get this pop up asking for confirmation if there are any associated comments.
Adding disbursement lines using the Cross Tab Grid view
With Abtrac you can quickly record out-of-pocket expenses (disbursements) against a project while you are completing your timesheet.
Abtrac will automatically link the disbursement to the selected project, so you don’t need to re-enter job details.
Start by selecting the line and cell displayed in the grid that you want to add a disbursement for, then Right Click and choose the Disbursement option.

This will open a popup window for entering expense details.
In the popup window:

- Click on the plus button to add one (or multiple) disbursement(s) for the selected project
- Select a Disbursement Type (e.g. mileage, printing, travel)
- Enter the Quantity
- Enter the Amount
Click Save in the popup window to add the disbursement to your timesheet.
Video: Cross Tab Grid timesheets
Other timesheet views and layouts
Abtrac offers multiple timesheet views and layouts to suit different working styles. In addition to Form view, you can use Grid view for faster, spreadsheet-style entry, and switch between Linear and Crosstab layouts depending on how you work.
You can change your layout at any time using the View option at the top of your timesheet, or save your preferred layout under Edit My Settings.
Read more:
Changing your timesheet view and layout
Abtrac KB# 2247/ AV # 0040