All invoices in Abtrac start out as unlocked/uncommitted.
What is the Commit/Uncommit Invoice option?
The Commit/Uncommit invoice option in Abtrac is a control feature that manages the finalisation invoices. It’s the status that controls whether an invoice is locked for editing, or still able to be changed.
The Commit/Uncommit option provides control and flexibility, allowing businesses to finalise invoices securely while still being able to make necessary adjustments when required.

Commit Invoice
Marks an invoice as complete and locks it from editing by users without the necessary privileges. This ensures that invoices included in reporting or sent to clients remain accurate and consistent. Committing is the authoritative step that signals an invoice is final. It can be managed with a single button, or tied into an Invoice Status selection.
Uncommit Invoice
Reverses the commit, allowing the invoice to be edited again by users with the appropriate privileges. This is useful if corrections or updates are needed after the invoice has been committed, such as adjusting line items, fixing errors, or updating billing information.
Why you should commit invoices in Abtrac
In Abtrac the status of committed is used to lock invoices.
Marking an invoices as committed is also used to signal that the invoice has been completed.
Committing an invoice will prevent users with lesser access from editing the invoice document. In Abtrac, users can commit and uncommit invoices based on their user group privileges.
Typically, we recommend that an invoice isn’t sent via email unless it is committed.

When to Use Invoice Status vs the Commit Invoice Option
Invoice statuses and the Commit Invoice button both help manage invoice workflows in Abtrac, but they serve different purposes and can be used independently or together.
Invoice statuses are primarily about communicating progress during the life of an invoice, while committing an invoice is the action that formally locks it as complete. Which approach you use depends on how much structure and visibility your invoicing process requires.
Use invoice statuses when:
- Your invoices move through multiple review or approval stages (e.g. Draft, Awaiting Approval, Returned for Changes).
- Several people are involved and need visibility of where an invoice is up to before it’s finalised.
- You want to track and report on invoice progress, not just whether it’s finished or not.
- An invoice may still be edited while it’s being reviewed or approved.
Use the Commit Invoice option when:
- You want a clear “complete vs not complete” workflow without managing multiple statuses.
- The main requirement is to lock the invoice once it’s finished to prevent accidental changes.
- Your team finalises invoices quickly and doesn’t need formal approval stages.
- You want committing the invoice to be the single point of finalisation before sending or reporting.
In practice, many businesses use both: invoice statuses to manage and communicate progress up until completion, and the Commit Invoice action as the final step that locks the invoice.
For simpler workflows, committing alone may be sufficient, while more complex approval processes benefit from using statuses before the invoice is committed.

See more in the article on Invoice Status.
Sending invoices in Abtrac – should you commit the invoice first?
Typically, we recommend that an invoice isn’t sent via email unless it is committed.
You can email an uncommitted invoice, but we recommend that you commit the invoice first and then send it through. If you try and send an uncommitted invoice, you’ll receive a warning message asking if you want to proceed.
See more in How to send eInvoices from Abtrac.
Learn more about the Accounts Link here
Read more about invoice payment options here
How to commit an invoice
Committing a single invoice
To commit a single invoice:
- Go to Invoices > Load Invoices
- Click on the invoice number
- From the Invoice Management page > in the Invoice Details section
- Click on the Commit Invoice button
- When prompted to confirm your changes, choose Yes

This commits the invoice and also changes the Invoice Status to Committed (if you don’t otherwise use invoice statuses).

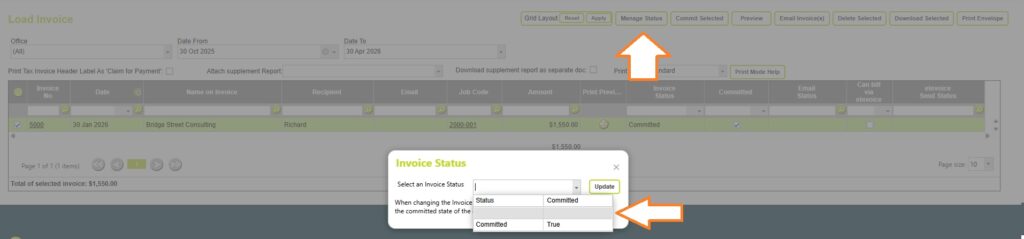
Committing Invoices In Bulk (Multiple invoices)
To commit one or more invoices:
- Go to Invoices > Load Invoices
- Select the invoice(s)
- Click Commit Selected at the top of the screen
- Confirm you wish to Commit the invoice, by choosing Yes when prompted.


This commits the invoice and hides it from the default view within the Load invoice screen.
You’ll need to update the Committed Filter option to view committed invoices.
Viewing Committed Invoices, Uncommitted Invoices or All Invoices
The Load Invoices screen shows uncommitted invoices (unchecked) from 3 months backward and forward of the current date by default.
Choose the required date range for viewing old invoices.
If the ‘Date From’ is less than or equal to a year from the current date, then it can be saved by clicking the ‘Apply’ button in the Grid Layout.
To view committed invoices, select the ‘Checked’ option for ‘Committed’ column header in the grid.
You can also choose to use the search filters for the column headers in the grid to view specific invoices. See Filtering results and searching.
If you want to preview all invoices for a single job, check out this article – How to Preview All Invoices for a Job.
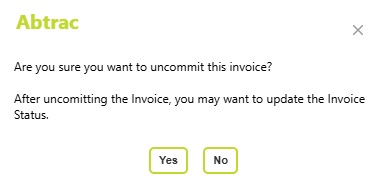
How to uncommit an invoice (unlocking an invoice for editing)
Any user with the User Privilege setting to commit/uncommit an invoice can go back and edit the invoice after uncommitting it.
Uncommitting a single invoice
To uncommit a single invoice:
- Go to Invoices > Load Invoices
- Click on the invoice number
- From the Invoice Management page > in the Invoice Details section
- Click on the Un-commit Invoice button
- When prompted to confirm your changes, choose Yes

Un-Committing Invoices In Bulk (Multiple invoices)
To un-commit one or more invoices:
- Go to Invoices > Load Invoices
- Select the invoice(s)
- Click Manage Status at the top of the screen
- If you don’t use invoice statuses, then choose the blank option to un-commit invoices
Uncommitting invoices that have been shared with your accounts
If you uncommit an invoice that is linked to an accounts batch you’ll be prompted to choose whether to leave the invoice in it’s original batch or to remove it from the upload batch and make it available to re-upload to your accounts.

Uncommitting invoices that have a Stripe payment link
If you uncommit an invoice that is linked to an online payments link via Stripe, when you uncommit the invoice – the payment link will also be removed.
You’ll need to reissue the invoice to your client with a new payment link once the invoice is committed again.
Administration Settings: Choosing who can commit and uncommit an invoice
From Administration >> Employees >> User Group Management, you can manage who can commit and uncommit an invoice.

Click on the Manage Privileges button for the relevant user group (Managers in this example). The ‘Manage User Privileges’ box appears.

Tick the Full Access box for Invoice Commit. This enables the users in this group to both commit and uncommit invoices. Save the changes.
Typically, in a business scenario, junior members will go through timesheets, liaise with project managers and then they would mark the invoice status as ready to send. The invoice will then be handed over to senior members who have higher privileges to commit and send it.
Administration Settings: System lock date for invoices
In Abtrac you can set a date in Administration >> Settings >> System Settings >> Miscellaneous Configuration to prevent any entries in your database being entered before this date.
Choose a date and save the record.

This locks all timesheets and invoices, so nothing can be entered, created or edited with a date equal to or less than the lock date.
Businesses would do this after closing off the last month end, or last quarter for example.
Any user with access to System Settings is able to adjust the lock date.
It’s recommended when using this feature to create two admin user groups, one with full access to System Settings and one without.
Abtrac KB# 2047