In Abtrac invoice payments and outstanding accounts can be managed independently from your accounting software with our optional Debtor Management module.
You can record invoice payments, account for write-offs and adjustments, and report on your debtors from this add-on module. When combined with the Abtrac Accounts link payments can sync automatically.
Debtors Management > Invoices and Payments
From Debtor Management >> choose Invoices and Payments.
Here you can view all invoices and their payments.

Managing unpaid invoices: Grouping and Sorting options
The invoices and payments screen optionally shows all the invoice, client and project information listed further below in this article, and also outline here: User Control Settings: Debtors – Invoices And Payments
You can optionally view invoices within a selected date range, see only those that have been uploaded to your accounts, and only view committed invoices. All the column options can be filtered, including by client owner, job owner, and office.
You will only see unpaid invoices by default
The Invoices and Payments screen filters by the ‘Paid’ column, and will show only unpaid (‘Unchecked’) invoices by default. You can set it to show all (leave blank) or only paid (select ‘Checked’) invoices.

Preview Invoices
Click on any invoice number to preview the invoice.
Go to Invoices
Click on any Name on Invoice to view all the invoice details from the Invoice Management screen.
Print Results: Unpaid Invoices report
Clicking on the ‘Print Results’ button will give ‘Invoices Report’. This contains the invoiced and outstanding amounts for the current selection.

Export to CSV
Choosing export to csv will export a tidy copy of the current onscreen invoice payment information.
Update Payments (only available with the accounts link)
With a subscription to the Abtrac accounts link you can also update payments back into Abtrac from your accounting software. (This is a paid add on to your subscription)

Clicking on update payments gives the following prompt to check your settings before proceeding.

Any new payments are automatically recorded against the relevant invoice with a preset comment. Those invoices paid in full are also automatically marked and a paid in full date is applied.

A confirmation of the number of attempted and successful payment matches is shown once the sync is completed.
Only payments, not adjustments will sync automatically
Please note when using the update payments option any manual adjustments or credits from your accounting system will not be re-synced and applied to Abtrac. It’s only true payments that will synchronise. In the example below the second invoice payment line has been added manually.

Adjustments for small balances
Occasionally you may find invoice payments and amounts vary between Abtrac and your accounting system by one or two cents.
This is usually due to an underpayment by the client, or sometimes it can be difference in the invoice tax, invoice total or invoice line calculations, typically when rounding or truncating to 2 decimal places, either before or after calculating tax inclusive totals. The rules here can vary between systems.
Choosing Adjustments for small balances records a journal adjustment against invoices where the payment for your accounts is over or under the Abtrac invoice calculated total by a few cents.
Choose the Adjustments for Small Balances option in the menu

Select an amount to filter out any invoices with unpaid values of greater or lesser amounts.

All unpaid invoices in the system will have an adjustment applied.
e.g. choosing adjust by (+/-) $0.0 will apply the adjustment to any invoice records with a Still owing/Paid balance of -$0.02 or $0.02
You cannot choose to apply the adjustment to selected invoices, it will process adjustments for all invoices that meet the criteria selected.
When completed a pop-up will show, confirming the number of adjustments processed.

For every adjustment a journal line is added as an invoice payment, it includes the deault adjustment comments and a log of the user who processed the change.

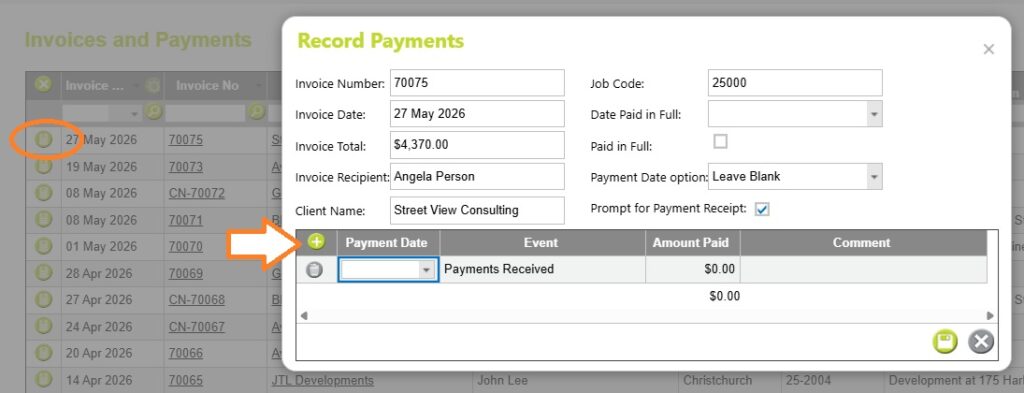
Recording Manual Payments (and adjustments)
To record an invoice payment, click the button on the corresponding invoice row.

To add an invoice payment click the (+) plus button in the Record Payments > Payments Grid. Select a date, a payment event, the amount paid and any comments.
Payment Events
There are five payment event types to choose from when recording payments manually in the Debtors Module: Payments Received, Uneconomic Amount Written Off, Bad Debts, Journal Adjustment and Discount Given. These options are then used in debtor reporting.
Each payment event type is used for a different kind of debtor transaction, allowing you to accurately track in your Receipts schedule report how an invoice balance was settled and report on those transactions separately. Depending on how your business is set up, these payment event types may also line up with different accounting codes or categories in your accounting system, such as bad debts, discounts, or adjustment journals.
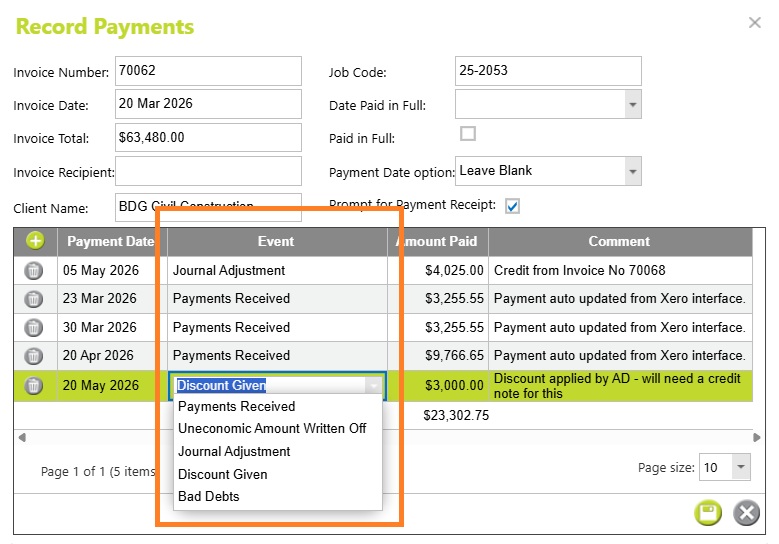
Payments Received
Payments Received are standard customer payments made against an invoice. These reduce the outstanding debtor balance and are typically used for normal cash receipts, EFT payments, or payments synced from accounting systems such as Xero.
Uneconomic Amount Written Off
Uneconomic Amount Written Off is used for very small outstanding balances that are not worth chasing, such as minor underpayments or rounding differences. This clears the invoice balance without requiring a formal credit note.
Bad Debts
Bad Debts are used when an outstanding invoice is considered unrecoverable and needs to be written off entirely or partially. This is commonly used for overdue invoices that will no longer be pursued for payment.
Journal Adjustment
Journal Adjustment is used for accounting-style adjustments between invoices or debtor balances, often involving credit notes, reallocations, or corrections. These entries commonly offset each other and may not represent actual cash received.
Discount Given
Discount Given is used when part of an invoice is waived as a negotiated or operational discount rather than through a formal credit note. This might include settlement discounts, goodwill reductions, or agreed reductions at the time payment is received.
Payment Date Option
From the ‘Record Payments’ pop up, you could choose to ‘Leave Blank’ the ‘Payment Date’ from the dropdown menu . With this option, you can manually enter a date for every new line added.

Or else, choose the ‘Use Today’s Date’ option to automatically add today’s date to the ‘Payment Date’.
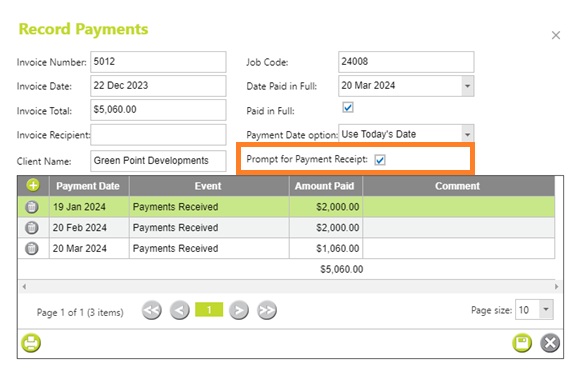
You can also check the tick box to ‘Prompt for Payment Receipt’.

Paid in full date
‘Date Paid in Full’ will be automatically filled in with the latest/most recent payment event date and the ‘Paid in Full’ tick box checked, once the payment(s) equals the invoice amount.
This date can be reset or changed, by editing the ‘Payment Date’ and is used as the date for payments in debtor reporting.

Payment receipts
Payment receipts can be emailed individually as payments are received, or generated in bulk for multiple payments at once. The receipt document can be customised with your logo and branding to match your invoices and other client-facing documents.
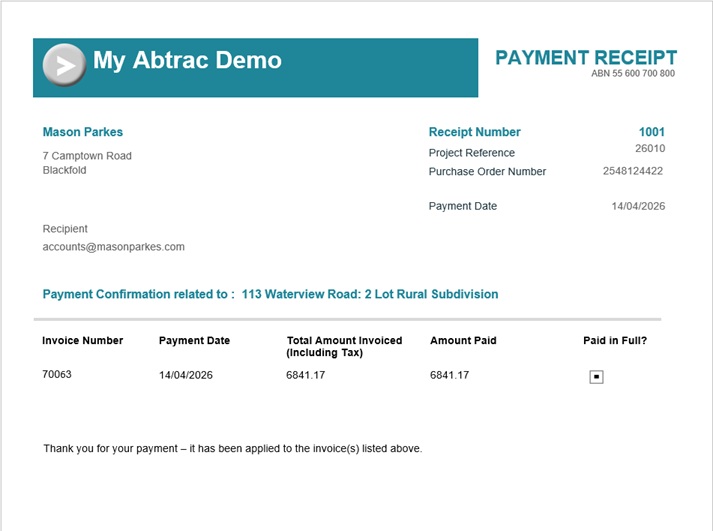
For any invoices paid in full, choose the printer icon in the record payments screen to print a payment receipt.

Alternately – once an invoice is paid in full you can be prompted to print a receipt if you have checked the ‘Prompt for Payment Receipt’ tick box.

A preview of your receipt document is loaded and can then be downloaded and shared with the client using your email application (outside of Abtrac).
Payment Receipts can be emailed to clients from the Invoice Payment Receipts menu.
Read more about Invoice Payment Receipts here
Customising onscreen options – User Control Settings
Like most screens in AbtracOnLine, you can change the display order of these fields from Administration >> Settings >> User Control Settings >> choose ‘Debtors – Invoices and Payments’ page.
See all the options here: User Control Settings: Debtors – Invoices And Payments

Note that ‘Job Description’ and ‘Client name’ can’t be enabled together. The below warning message appears at the bottom of the grid if you try to enable both.

Abtrac KB# 2045