
The MYOB Business accounting interface connects Abtrac with MYOB, allowing you to move accounting information between the two systems without having to enter it twice.
Once connected, you can use the interface to:
- Send invoices from Abtrac to MYOB Business
- Synchronise invoice payments from MYOB back to Abtrac
- Import supplier bills from MYOB into Abtrac
- Export purchase orders from Abtrac to MYOB
- Export payroll information from Abtrac to MYOB
Before you start using these features, you’ll need to authorise the connection and choose how you want Abtrac and MYOB Business to work together.
Quick Setup Checklist
- Create the MYOB connection
- Authorise MYOB access
- Configure interface preferences
- Set up tax codes
- Create GL account codes
- Link Invoice Office Settings
- Update existing invoices (optional)
- Start sharing invoices (and other information)
Before you connect to MYOB Business
You’ll need an active MYOB Business company file and access to the appropriate company.
An MYOB user with full Administrator rights must complete the initial authorisation from Abtrac.
This authorisation establishes the connection for your organisation. Once it has been completed, Abtrac users who have permission to use the accounting interface can work with the MYOB Business connection without each person having to sign in to MYOB individually.
Read more about MYOB authorisation here
Connecting Abtrac to MYOB Business
Adding a new accounts connection
To connect Abtrac and MYOB go to: Accounting > Interface Settings
Alternatively, you can access the accounting interface settings from: Administration > Settings > Invoice Settings > Accounting Interface Settings
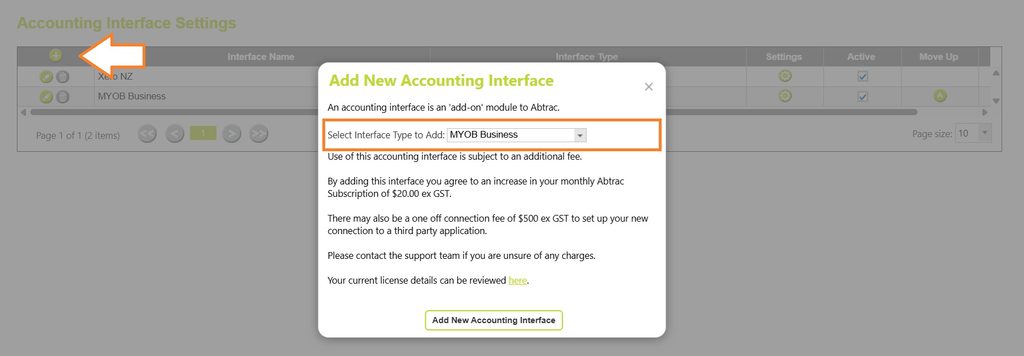
Choose the add button to create a new connection, and select MYOB Business as the accounting interface.
Naming your accounts connection
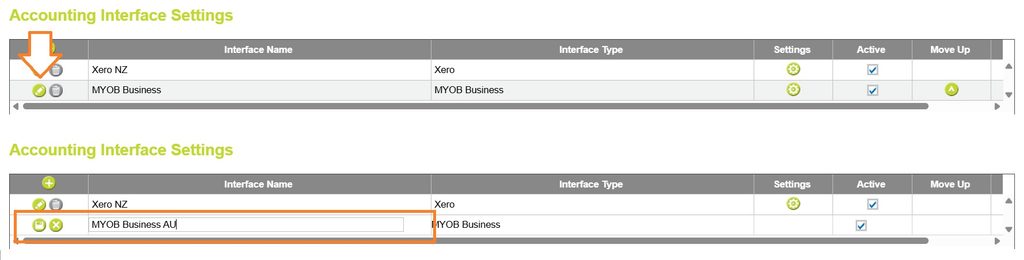
While the Interface Type is fixed, you can change the Interface Name to make it clear which accounts the connection relates to, for example from MYOB Business → MYOB New Zealand
Using a descriptive name makes it easier for users to identify the correct accounts connection when working across multiple offices or accounting organisations.
To rename the connection, click the pencil icon in the Accounting Interface Name row, then enter your new Interface Name, then save your changes.
Authorising the MYOB and Abtrac connection
from the MYOB Connection box > click Authorise MYOB
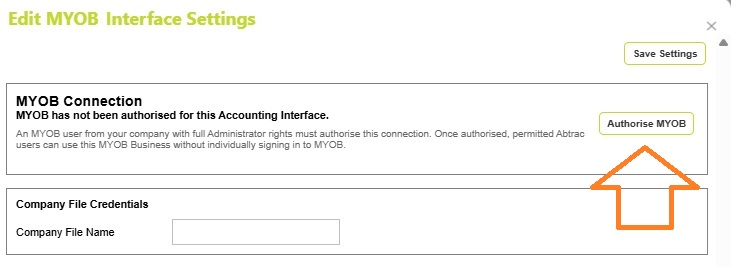
You’ll then need to login to MYOB, and authorise the connection between Abtrac + MYOB by following the prompts.
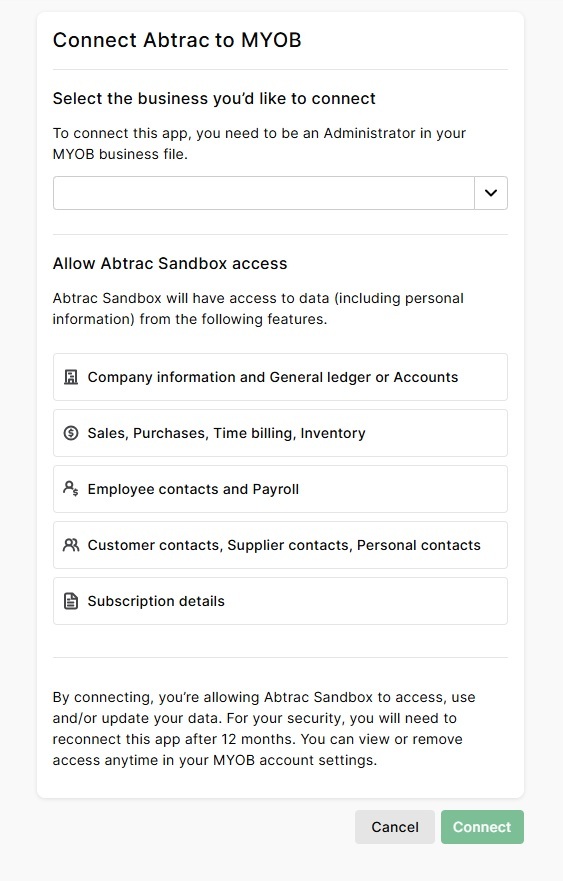
Once the connection has been authorised a token is issued to Abtrac from MYOB, authorising all Abtrac users with appropriate Abtrac permissions to share information to MYOB – without logging in to MYOB.
This authorisation token is typically valid for 12 months.

You can disconnect Abtrac from MYOB at any time, either from the Accounting > Interface Settings page in Abtrac, or from the App Connections page in MYOB.
Read more about MYOB authorisation here
Once authorisation is complete, return to the MYOB Business interface settings in Abtrac to complete the remaining setup.
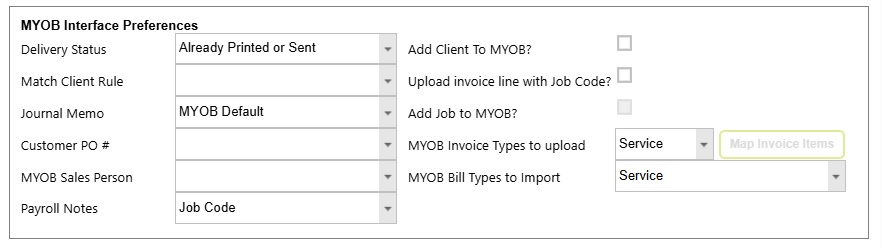
MYOB Interface Preferences
The MYOB Interface Preferences determine how Abtrac handles information when exchanging data with MYOB Business.
You can tailor these settings to suit the way your organisation manages invoices, clients, jobs and other accounting information.
Invoices
Delivery Status
Choose the Delivery Status that should apply when invoices are sent from Abtrac to MYOB.
This controls the status of the invoice created in MYOB Business. The options are:
- Already Printed or Sent
- To be Printed
- To be Emailed
- To be Printed and Emailed
Journal Memo
Choose what information from Abtrac should be used for the MYOB Journal Memo when invoice information is sent to MYOB.
Journal Memo options are:
- MYOB Default
- Task
- Invoice Heading Line
Select the option that provides the most useful reference for your accounting team when viewing transactions in MYOB.
MYOB Default
By default, the Journal Memo in MYOB is populated with ”Sale; MYOB Customer Name”.
Task
Instead of this, in Abtrac you can choose to upload to MYOB and display the name of the task associated with the first invoice line with a task for that invoice.
If Journal Memo = Task in Abtrac but an uploaded invoice has no associated tasks, then the system will instead display ” – “.
Abtrac Invoice Heading Line
Another option for the Journal Memo is the Abtrac Invoice Heading Line from the ‘Invoice Management’ screen. From Invoices >> Load Invoices >> click on the relevant invoice number to go into ‘Invoice Management’ screen and view/edit an invoice heading line.
Customer PO
Choose how you want the Customer PO # field in MYOB to be populated from your Abtrac invoices.
MYOB Customer PO#s on invoices can be matched to:
- Abtrac Invoice Purchase Order Number
- Abtrac Job Code
MYOB Sales Person
Use this setting to control the Sales Person recorded on invoices sent to MYOB. You can use the Abtrac Job Manager as the MYOB Sales Person, or leave this field blank.
MYOB Invoice Types to upload
The MYOB Invoice Types to upload setting determines how invoices from Abtrac are created in MYOB.
Invoices shared to MYOB can be matched to these MYOB Field layouts on invoices:
- Service
- Item
You can choose to create invoices using a Service or Item format. In current MYOB Business terminology, these broadly correspond to the Services and Services and items field layouts. Services are designed for invoices that don’t require item fields, while Services and items allows invoice lines to reference items set up in MYOB.
For most professional services businesses, the Service option will be appropriate.
If you choose to upload invoices using the Item format, you can also map MYOB Item Numbers to your Abtrac GL Account Codes. When the invoice is sent to MYOB, the GL Account Code assigned to each Abtrac invoice line is used to determine the corresponding MYOB Item.
Clients and Jobs
Match Client Rule
The Match Client Rule tells Abtrac how to identify the corresponding MYOB customer when an invoice is shared.
This is particularly important where clients already exist in both systems.
Choose the matching rule that best fits how your organisation maintains client records.
Clients can be matched using any of the following rules:
- Abtrac Client ID to MYOB Card ID
- Abtrac Client Name to MYOB Customer Name
- Abtrac Name on Invoice to MYOB Customer Name
- Abtrac Job Code to MYOB Card ID
- or a customised Abtrac Job Card ID to MYOB Card ID
Add Client To MYOB?
Enable Add Client To MYOB? if you want Abtrac to create a new MYOB customer when a matching customer cannot be found.
If this option is not enabled, the corresponding customer will need to already exist in MYOB before information requiring that customer can be successfully shared.
If you are allowing Abtrac to create customers, it is particularly important that your Match Client Rule is appropriate. Matching by name requires consistent naming to avoid creating duplicate customer records.
Upload invoice line with Job Code?
Enable Upload invoice line with Job Code? if MYOB job information should be included with invoice lines sent from Abtrac.
This allows MYOB transactions to retain the relevant Abtrac job reference where applicable.
Add Job to MYOB?
Enable Add Job to MYOB? if you want Abtrac to create MYOB Jobs where the required job does not already exist.
Use this together with your Job Code settings according to how your organisation uses Jobs within MYOB.
Bills and Payroll
MYOB Bill Types to import
The MYOB Bill Types to Import setting determines which types of MYOB supplier bills can be brought into Abtrac as office disbursements.
Select the bill types that are relevant to your Abtrac project management processes:
- Service
- Item
- Professional
- Miscellaneous
Importing bills allows relevant supplier costs recorded through your accounts to also be brought into Abtrac for project and cost management purposes.
Payroll Notes
Choose what information from Abtrac is included in the Note field when timesheets are exported to MYOB for payroll.
You can use either:
- Job Code – includes the Abtrac Job Code for the timesheet entry.
- Timesheet Line Comments – includes the employee’s comments from the Abtrac timesheet line.
MYOB allows an optional Note to be recorded against each timesheet entry, so this setting lets you choose which Abtrac information is most useful to display there.
MYOB Tax Code Preferences
Abtrac uses the tax settings on your invoices and invoice lines to determine which tax code is applied when an invoice is sent to MYOB.
Your standard sales tax preferences are configured from Administration > Settings > Invoice and Other Office Settings. Here you can define your Sales Tax name and choose how tax is applied to invoices.
Abtrac Include Tax on Invoice options
The Include Tax on Invoice options are:
- Yes – tax is applied to all applicable invoice lines.
- No – tax is not applied to the invoice lines.
- Selected Items – tax can be applied to selected invoice lines only.

These settings determine whether individual invoice lines in Abtrac include tax. If required, the tax treatment can also be reviewed and changed when editing an invoice or individual invoice line.
Mapping Abtrac tax settings to MYOB tax codes
In your Accounting Interface Settings, set up the MYOB tax codes that correspond with the tax treatment used on your Abtrac invoices.
When an invoice is sent to MYOB, Abtrac uses the tax setting on each invoice line together with these mappings to apply the appropriate MYOB tax code.
Use Manage Tax Codes button to add the MYOB tax codes and associated tax rates available to the interface.
Then set the Default tax code and Default No-tax codes to use on Abtrac invoices.
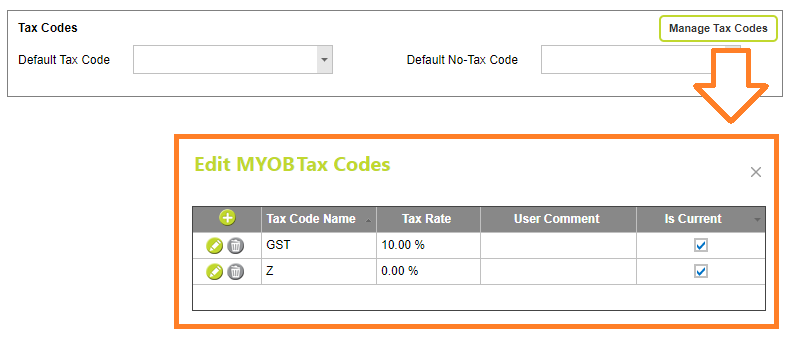
For example, your Default Tax Code might be GST, while your Default No-Tax Code might be Z.
The default mapping works as follows:
- Abtrac’s Include Tax on Invoice = Yes → uses the MYOB Interface Default Tax Code
- Abtrac’s Include Tax on Invoice = No → uses the MYOB Interface Default No-Tax Code
- Abtrac’s Include Tax on Invoice = Selected Items → the tax treatment is determined for each individual invoice line, with the appropriate default Tax or No-Tax code applied.
Additional tax codes can also be configured and selected for individual invoices or invoice lines where the tax treatment differs from your defaults.
In some instances, you may need to change the tax settings for individual invoices from edit invoice details first.


Linking Abtrac Invoice Settings to Your Accounts
How Invoice Office Settings Work
To create invoices in Abtrac, you must have at least one Invoice Office Setting.
Invoice Office Settings contain the rules and defaults used when creating invoices, including:
- Invoice terms and conditions
- Tax settings
- Bank account details
- Invoice layouts, logos and document settings
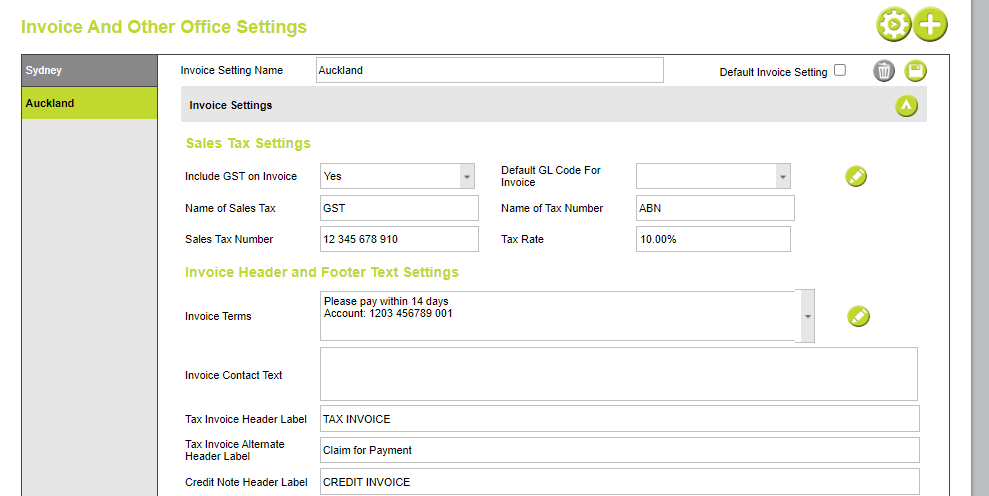
Read more about Invoice Office Settings here.
If your business uses a single Invoice Office Setting, all invoices will use those settings by default.
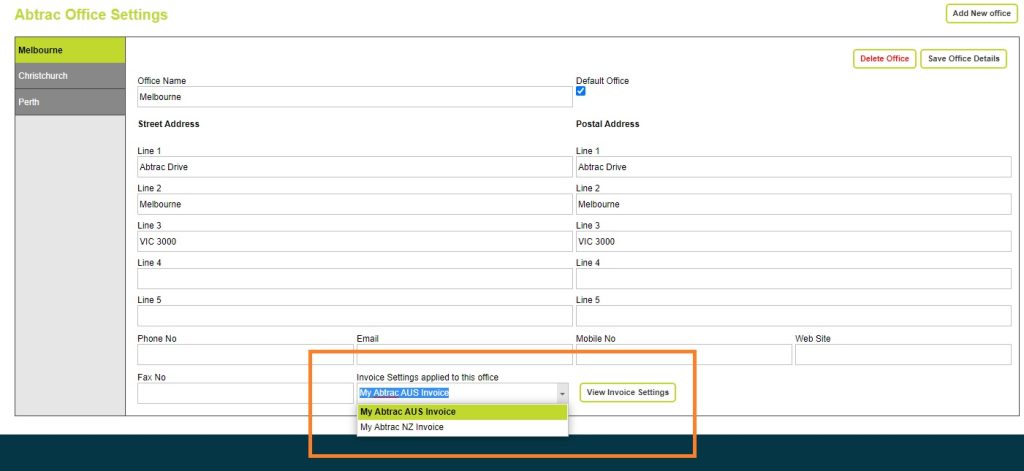
Abtrac Offices can also be linked to different Invoice Office Settings. While assigning an Office to every project is not compulsory, it is recommended where different parts of your business have different invoicing requirements.
For example, your New Zealand offices may use different invoice terms, tax settings, bank account details and branding from your Australian offices.
Connecting Invoice Office Settings to MYOB
Every MYOB Business connection must be linked to at least one Invoice Office Setting. This tells Abtrac which invoices belong to that MYOB company.
For most subscribers, this will simply be the default Invoice Office Setting 1.

More complex organisations may:
- Link multiple Invoice Office Settings to the same MYOB company.
- Link different Invoice Office Settings to different MYOB companies.
- Use different Invoice Office Settings for different offices, regions or business units.
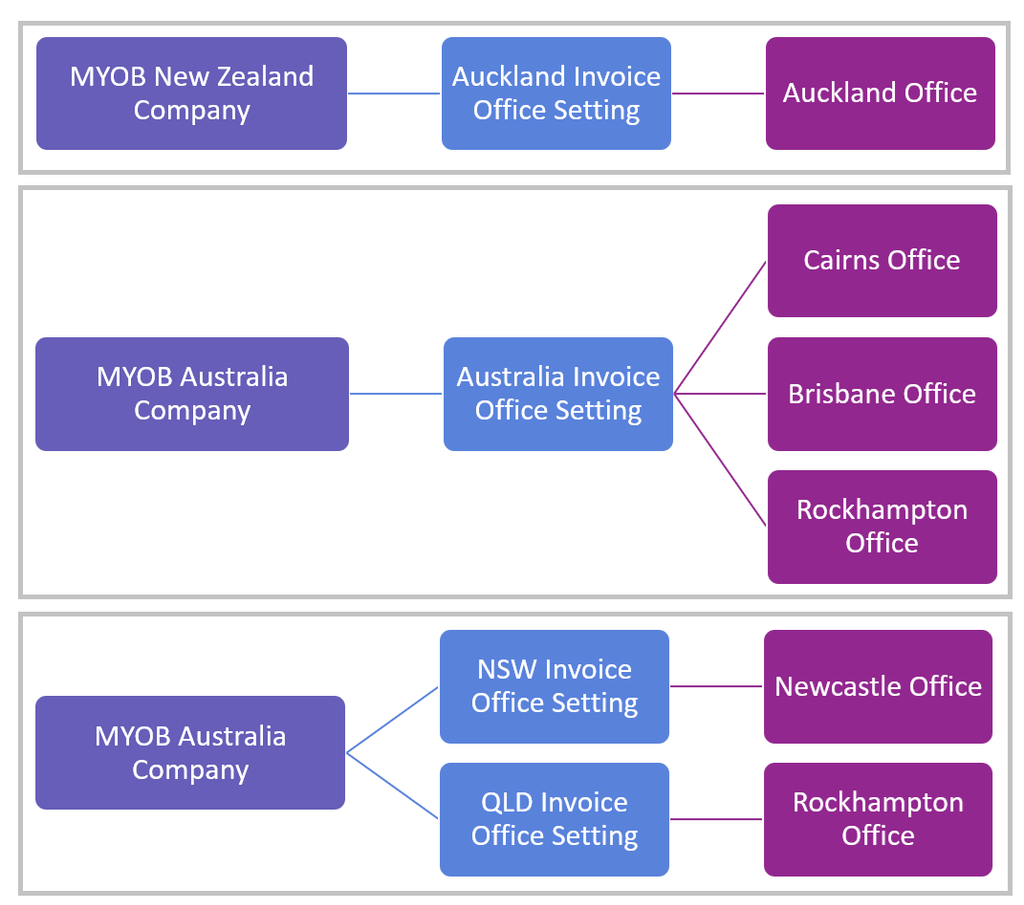
For example:
- Auckland Office → Auckland Invoice Office Setting → MYOB New Zealand Company
- Cairns, Brisbane and Rockhampton Offices → Australian Invoice Office Setting → MYOB Australia Company
- Newcastle Office → NSW Invoice Office Setting → MYOB Australia Company
- Rockhampton Office → QLD Invoice Office Setting → MYOB Australia Company
Set Up Your GL Account Codes
Before you can add an Invoice Office Setting to the MYOB Business interface, you first need to configure the GL Account Codes that will be available to it.
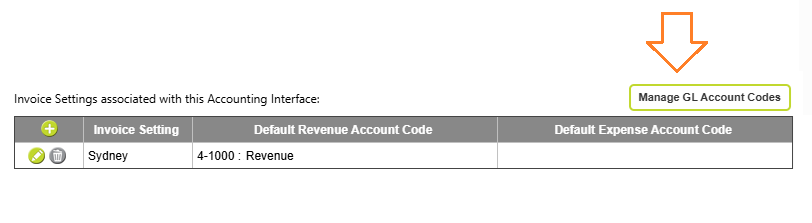
From Accounting > Interface Settings, click Manage GL Account Codes and add the account codes your organisation requires for invoices and disbursements.
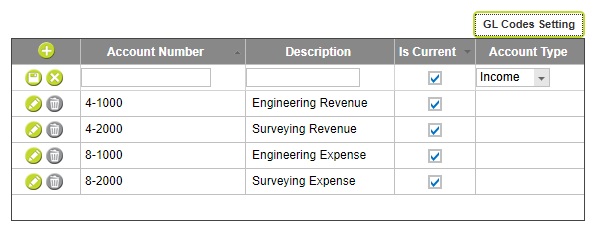
You can add as many GL Account Codes as required. For each code, enter:
- The GL Account Number
- A Description
- The Account Type (Income or Expense)
Once saved, these GL Account Codes become available when linking Invoice Office Settings to the MYOB connection.
Add Invoice Office Settings to the MYOB Connection
After your GL Account Codes have been configured:
- Click the + button in the Invoice Settings associated with this Accounting Interface section.
- Select the Abtrac Invoice Office Setting you want to connect.
- Choose the default Revenue GL Account Code for invoices created using that Invoice Office Setting.
- Optionally choose the default Expense GL Account Code for disbursements imported from MYOB or purchase orders exported to MYOB.

Save your settings within the Invoice Settings grid before continuing,

You must link at least one Invoice Office Setting before invoices can be shared through this MYOB Business connection.
Using Additional GL Account Codes
The Revenue and Expense account codes selected above become the default accounting codes for invoices associated with that Invoice Office Setting.
Additional GL Account Codes can also be used on individual invoices or invoice lines where required.
Abtrac can apply these automatically based on your configured rules, or users can select alternative GL Account Codes when preparing invoices.
For example, different GL Account Codes can be assigned based on:
- Office
- Department
- Job Type
- Task
- Disbursement Type
You can also review and change GL Account Codes on individual invoice lines before sharing an invoice to MYOB.
See also: How your account codes (GL Codes) are assigned to an Abtrac invoice and invoice lines.
Updating Existing Invoices with Accounts Settings (Update Historic Invoice Data)
If you add or change Invoice Office Settings, Tax Codes or GL Account Code mappings after invoices have already been created, you can update existing invoices using the Update Historic Invoice Data option.
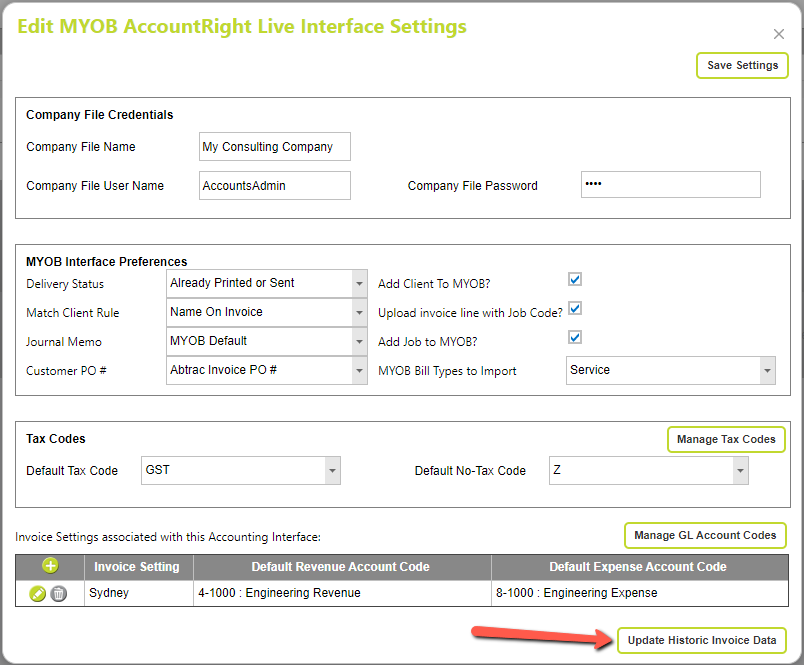
This function applies your current accounting interface settings to invoices that have not yet been uploaded to MYOB.
Click Update Historic Invoice Data, enter a date, then click Update.
The date you select effectively divides your existing invoices into two groups:
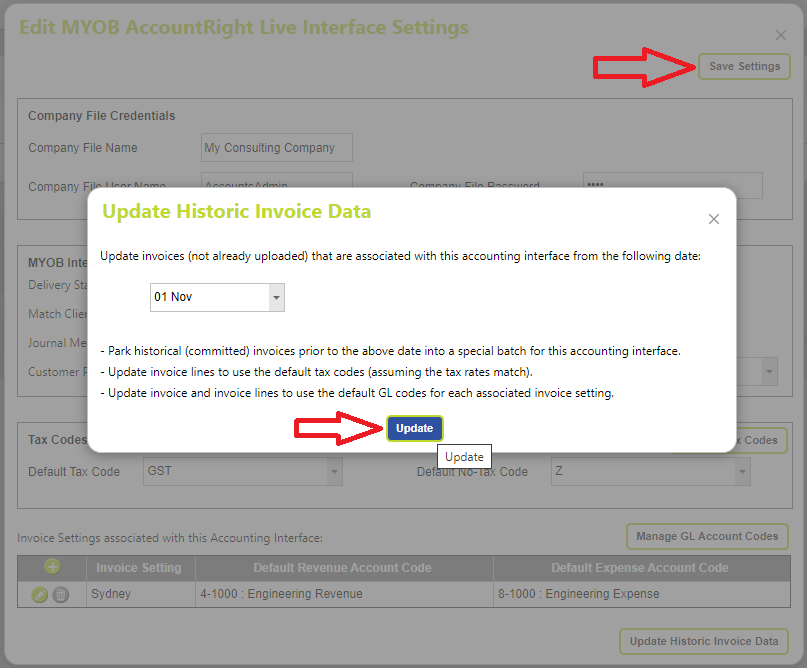
Invoices before the selected date
Committed invoices dated before the selected date will not have the current accounting interface settings applied to them.
Instead, these invoices are placed into a special parked accounting batch and are excluded from the normal accounts sharing process. This helps preserve the accounting settings that existed when those invoices were originally created and prevents historical invoices from being unintentionally updated and shared with incorrect accounting settings.
Invoices on or after the selected date
Invoices dated on or after the selected date will be updated to use the current MYOB Business interface settings.
This includes:
- Applying the default tax code mappings where the tax rates match.
- Applying the default Revenue and Expense GL Account Codes associated with each Invoice Office Setting.
- Updating invoice and invoice line accounting settings so they can be shared to MYOB using the current configuration.
These invoices will then be available for sharing to MYOB using the updated accounting settings.
This function is particularly useful when:
- Connecting an Invoice Office Setting to MYOB for the first time.
- Adding new GL Account Codes.
- Changing default Revenue or Expense account mappings.
- Updating tax code mappings.
- Moving invoice processing to a different accounting connection.
Once the update has completed, click Save Settings to save any changes made to the MYOB Business interface configuration.
What the MYOB Integration can do
Send invoices to MYOB Business
Invoices are created and managed in Abtrac first.
When an invoice is ready, it can be shared through the MYOB Business accounting interface. Abtrac uses your interface settings to determine:
- which MYOB customer the invoice belongs to
- whether a new customer should be created if required
- whether Job Codes are included
- whether MYOB Jobs can be created
- the information included in MYOB reference fields
- which invoice types can be uploaded
This keeps Abtrac as the source of your project billing information while allowing the resulting accounting transaction to be managed in MYOB.
Synchronising invoice payments from MYOB
After invoices have been sent to MYOB, payments received and recorded against those invoices in MYOB can be synchronised back to Abtrac.
This keeps the payment status of your Abtrac invoices up to date without requiring payments to be entered separately into both systems.
For the best results, payments should be recorded against the corresponding invoice in MYOB before synchronising payment information back to Abtrac.
Importing bills from MYOB
The MYOB Business interface can also bring eligible supplier bills from MYOB into Abtrac.
The MYOB Bill Types to Import preference determines which types of bills are available to the interface.
Importing bills allows relevant supplier costs recorded through your accounting workflow to also be brought into Abtrac for project and cost management purposes.
Exporting purchase orders to MYOB
Purchase orders created in Abtrac can be exported to MYOB Business through the accounting interface.
This allows purchase order information to originate from the project or cost management process in Abtrac and then flow through to MYOB for the accounting side of the transaction.
Exporting payroll information
Abtrac can also export payroll information for use with MYOB Business.
Check your payroll-related interface preferences, including Payroll Notes, before your first export to make sure the information is being prepared in the format required by your organisation.
Notes on the MYOB Business integration
- MYOB Business has a character limit on some text fields. Where the characters in your Abtrac invoices are greater than those available in MYOB the integration will truncate the data imported to fit.
- Only one invoice email recipient will be imported to MYOB
- It’s possible to choose to add clients to MYOB using the invoice import, any minor misspellings/spelling changes on client names could result in duplicate records in MYOB.
- Job/Project details will only be added to MYOB if the upload invoice lines with Job codes option is also selected
- The Payroll sync is not available for MYOB Business New Zealand
Chart of details for the Abtrac + MYOB link

Abtrac KB# 2283