Payment Receipts allow you to acknowledge payments received against invoices and provide confirmation to your clients that funds have been applied to the correct invoice.
Receipts can be emailed individually as payments are received, or generated in bulk for multiple payments at once. The receipt document can be customised with your logo and branding to match your invoices and other client-facing documents.
Why Send Payment Receipts?
While not every business requires payment receipts, they can be particularly useful in project-based industries.
Payment receipts can help:
- Confirm that payment has been received and applied correctly.
- Provide assurance that work can proceed to the next stage of a project.
- Keep multiple project stakeholders informed without additional emails or phone calls.
- Help clients who manage multiple projects and invoices track which payments relate to which jobs.
- Provide a professional record of payments received.
Sending Individual Payment Receipts
Payment receipts can be viewed for an individual invoice directly from the Invoices and Payments page.
From Debtor Management >> choose Invoices and Payments.
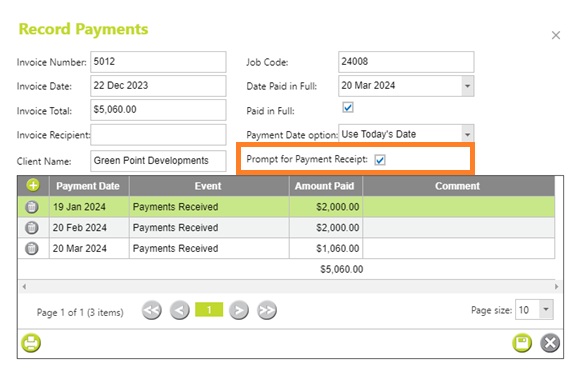
To view an invoice payment, click the Record Payments button on the corresponding invoice row.

Read more about recording invoice payments with the debtor module here
Print Payment Receipts
For any invoices paid in full, choose the printer icon in the record payments screen to print a payment receipt.

Alternately – once an invoice is paid in full you can be prompted to print a receipt if you have checked the ‘Prompt for Payment Receipt’ tick box.

Update Payment Receipt Comments for individual invoices
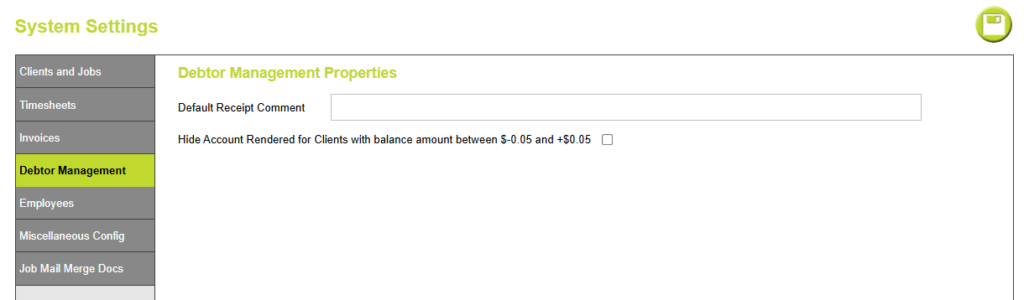
When printing receipts from the Invoices and Payments page you can create and edit unique comments for each receipt that is generated. The default comment displayed here can be specified from Administration > Settings > System Settings > from the Debtor Management Tab.

After clicking Print Preview, a preview of your receipt document is loaded and can then be downloaded and shared with the client using your email application (outside of Abtrac)
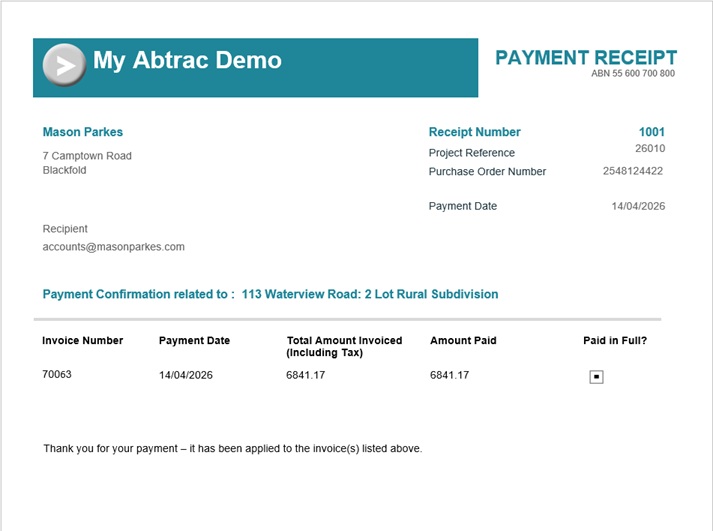
An example of the standard invoice payment receipt template is shown below, instructions on how to customise your receipt template are further on in this article.

Sending Payment Receipts in Bulk
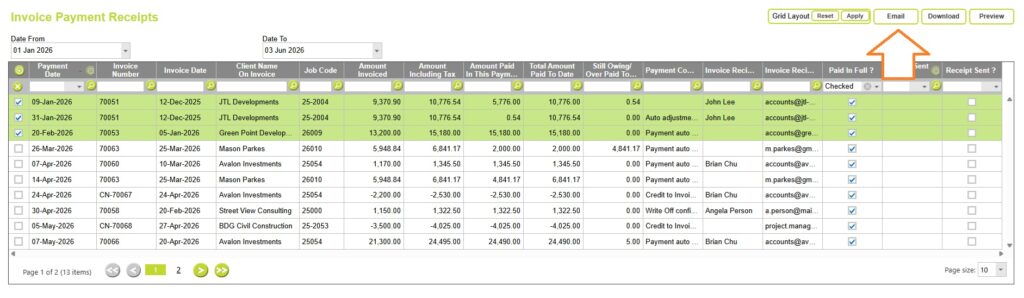
The Invoice Payment Receipts page allows you to generate or send receipts for multiple payments at once.
From Debtor Management >> choose Invoice Payment Receipts
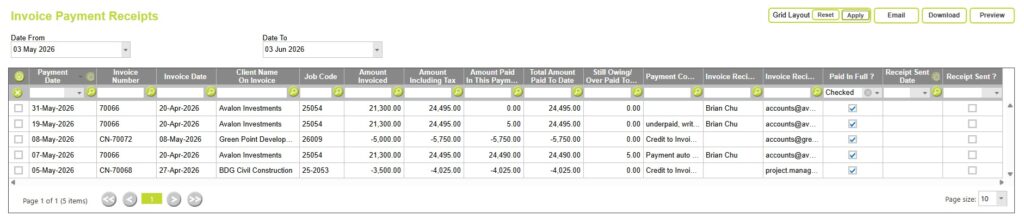
The page displays all invoice payments within the selected date range.
Date Filters
Use the Date From and Date To fields to control which payments are displayed.
These dates are based on the payment date, allowing you to review recent payments and identify receipts that have not yet been sent.
Invoice Payment Receipts Grid
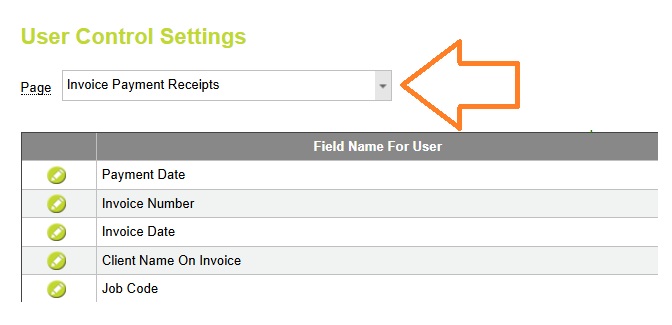
The grid displays invoice payment information and receipt status for each payment. You can customise the visibility and order of fields for this grid from Administration > Settings > User Control Settings > by choosing the Invoice Payment Receipts page.
Sending Receipts
Select one or more payment rows from the grid and choose one of the following options: Preview, Download or Email.
Preview
After selecting your payments choosing Preview opens a preview screen of the selected payment receipts, from here you can export or download the payment receipt documents.
Download
After selecting your payments choosing Download creates a PDF copy of the selected receipt(s) for saving or sending outside of Abtrac.
After selecting your payments choosing Email will send the receipt directly to the invoice recipient using the email address recorded against the invoice.
When emailing payment receipts in bulk, you cannot customise the email message or attach additional documents. For this reason, when you select Email, Abtrac displays the following confirmation message:
“The selected Receipts will be sent via Email directly to the assigned email address. Do you want to proceed?”
Click OK to send the selected payment receipts to their assigned recipients, or Cancel to return to the Invoice Payment Receipts page without sending.

Emails are sent from Abtrac using the address [email protected], with the payment receipt attached as a PDF document.
An example of the email received by your client is shown below:

Receipt Tracking
Abtrac records whether a receipt has been sent and the date it was issued.
The Receipt Sent? and Receipt Sent Date columns allow you to quickly identify payments that have already been acknowledged and avoid sending duplicate receipts.
Customising payment receipts
Payment receipts use the same document branding framework as invoices and other financial documents.
Depending on your configuration, receipts can include:
- Company logo
- Business contact details
- Custom document branding
- Payment information
- Invoice details and balances
This allows payment receipts to maintain a consistent professional appearance across all client communications.
Creating/choosing a Receipt Template
From Administration >> Settings >> Invoice and Other Office Settings > choose Invoice, Account Rendered, Purchase Order, and Receipt Templates
Click on the edit button for the Default Receipt Template. This will take you to the Report Designer screen with the Receipt Template created from Abtrac.

Click on the ‘+’ button to add a new report template.

You can clone this template from the existing template and give it a new name. It is always best to keep the original template as such and clone other templates that you use from it, so that there is always a back up template.
An example of the standard invoice payment receipt template is shown below.
Setting your default Receipt comment.
When printing receipts from the Invoices and Payments page you can create and edit unique comments for each receipt that is generated.
A default receipt comment can be specified from Administration > Settings > System Settings > from the Debtor Management Tab.
Abtrac KB # 2254