
Most of the high-use screens in Abtrac display information in tables (data grids). These tables include built-in tools to help you organise, search and view your data more efficiently, and can be customised to suit the way you work.
In this article you’ll learn how to:
- Work with Tables
- Save your own table layouts (and set your table sizes)
- (Administrators) Customise the default layout for all users.
Working with Tables
Sort Records
Click on a header to sort by a particular column. A black arrow will then display to indicate the sort order.
Click again to reverse the order (eg. A to Z, or Z to A).

Resize Columns
Hover in the header between the column margins to resize a column width. A double arrow will display, click and drag to resize the columns
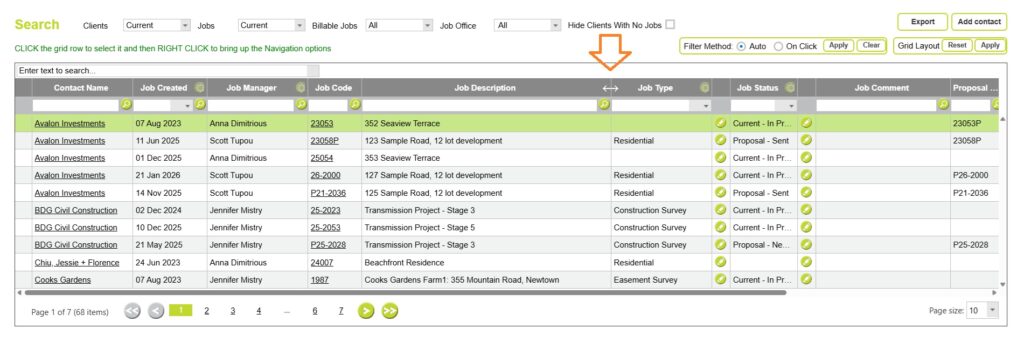
If the page supports Grid Layouts, you can save your changes using Grid Layout > Apply.
Rearrange Columns
To rearrange the order of columns, click and hold a header and drag it across to your preferred location.

If the page supports Grid Layouts, you can save your changes using Grid Layout > Apply.
Filter Records
Most columns include filtering options.
Depending on the type of data, you can:
- Select values from a drop-down list.
- Type directly into a filter box.
- Filter by text, numbers or dates.
Filtering lets you quickly reduce the list to only the records you need.
You can filter the results displayed by choosing a drop down option provided.

Search within a Column
Type to filter and search
You can also specify a specific filter result and search by typing into the boxes provided underneath the column headers.

Check and choose the search options
Text filters support different search methods, including:
- Contains
- Starts With
- Equals
- Does Not Contain
By clicking on the search icon you can choose the option that best suits your search.

Filter Dates
Type to filter and search dates great or equal to
You can select a date and choose from the given criteria.

Use the date filter to search within a date range
Or you can click on the date settings button to select the date range.
From the pop up box that appears, you can either select specific dates from the dropdown or tick the box for a preselected date range.

To clear the selection, you can click on the x or untick the ticked box.

Group Records
If your grid has a grouping option (like the Email Management screen) you can drag column headers to group data together.
Once grouped you can then choose to expand or hide results for individual groupings.

Default Filters
Some pages open with filters already applied to improve performance and reduce the amount of data displayed.
For example:
- Search Clients & Projects initially displays Current records only.
- Load Invoice initially displays Current and Uncommitted invoices.
If you can’t find a record you expect to see, check the filters at the top of the table before assuming the record doesn’t exist.
If you can’t find what you are looking for, then check the current or committed records filters first.
Search Clients and Projects – you are initially restricted to Current Clients and Projects only.

Load Invoice – only displays current, uncommitted invoices until you amend the filtering.

Saving Your Own Grid Layout and Table Size
Grid Layout Apply
Many pages include a Grid Layout option above the table.

A Grid Layout saves your preferred arrangement of that page so you don’t need to set it up each time you visit.
Your saved layout can include:
- Column order
- Column widths
- Number of Rows (Table Height)
- Sorting
- Filters
- Grouping
After making your changes, click Apply to save the layout.

The next time you open that page, your saved layout will automatically be applied.
If you’d like to return to the original layout, click Reset.
Managing Multiple Grid Layouts
Some pages include Manage Layouts instead of the standard Grid Layout option. Manage Layouts allows you to save and switch between multiple named layouts for the same page.
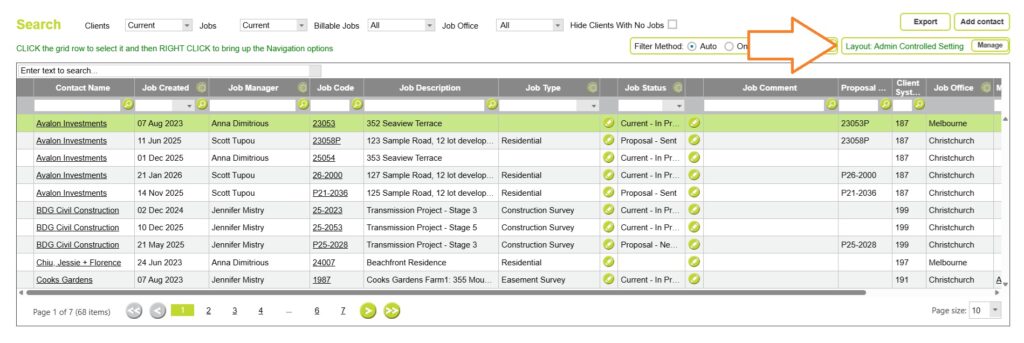
Like Grid Layouts, Manage Layouts saves your preferred arrangement so you don’t need to set it up each time you visit.
Each saved layout can include:
- Column order
- Column widths
- Number of rows displayed (Grid Height)
- Sorting
- Filters
- Grouping
When you first open the page, the active layout will display as Layout: Admin Controlled Setting. This is the default layout configured by your administrator through User Control Settings.
To create your own layout:
- Arrange the table as required.
- Click Manage in the top-right corner of the table.
- Enter a name in the Save current view as a new layout field.
- Click Save as New.
Your new layout will be applied immediately and will be available whenever you return to the page.
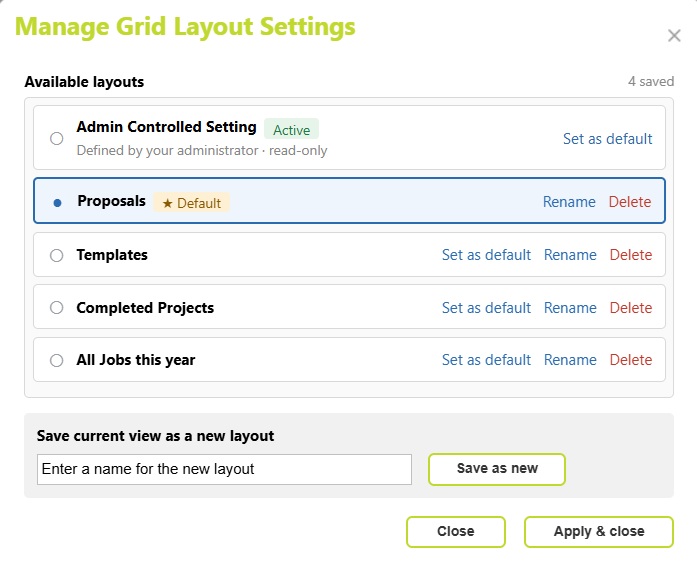
To manage your saved layouts, click Manage again. From here you can:
- Rename a layout.
- Set a layout as your default.
- Switch between saved layouts.
- Delete layouts you no longer need.
You can save up to 10 layouts per page.
Adjusting Table Size
By default, Abtrac displays 10 rows in most tables. If you’d prefer to see more records at once, you can increase the number of rows displayed.

Adjusting Table Rows for a single page
For a single page and table, you can edit the number of rows that display using the Page Size option in the bottom right of the table.
Update the desired number of rows to display.
If the page supports Grid Layouts, you can save your changes using Grid Layout > Apply.
Adjusting Table Rows for all pages (Personal Settings)
You can customise the number of rows displayed on tables throughout Abtrac without affecting other users.
From any page click on your Profile Icon > and choose Edit My Settings

Use the Grid Height setting to choose to display between 10 and 50 rows for each table in Abtrac.

Administrator: Default Grid Layouts
Administrators can customise the default layout of many screens for everyone in the organisation.
From Administration > Settings > User Control Settings > Grid Pages you can customise the default layout by:
- Showing or hiding columns.
- Changing column widths.
- Reordering columns.
- Setting the default appearance of supported pages.

If your organisation doesn’t use a particular field, you can hide it by setting its width to 0.
For example, if users always use tasks and comments when entering timesheets, the Activity column may not be required and can be hidden to create more space.
Read more about the available User Control Settings for All Tables here
Video: Tips for new Abtrac users
Abtrac KB# 2064